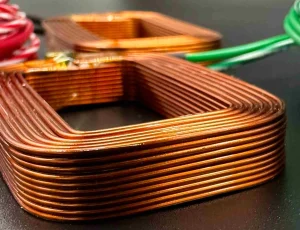
A toroidal taping/winding machine builds and finishes ring-shaped coils. It loads wire or insulating tape into a shuttle (or magazine), rotates the toroidal core, and lays each turn with controlled pitch, speed, and tension. You’ll see these machines in transformer shops, EV power assemblies, audio power supplies, medical devices, and any place where low-leakage, low-noise toroidal parts are made.
In addition, when equipped with a taping head, the machine wraps paper/polyester/kapton tapes evenly around the core. This improves insulation and mechanical strength while ensuring a clean, uniform, and repeatable taping process.

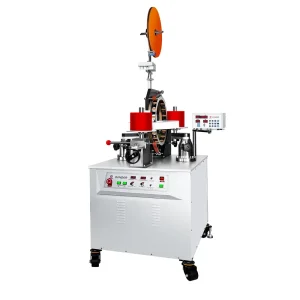
This guide covers Guangri’s PLC-controlled models, including the JGC series. With a durable design and a smart PLC controller, operators can save recipes, switch between auto and pedal modes, and achieve consistent production across every shift.
Power & Safety Setup
Before starting any winding or taping operation, always put safety first. First, install the machine in a clean, well-ventilated area with a temperature of 13–35°C, low vibration, and no corrosive fumes. In addition, ensure proper grounding and use the correct circuit breaker for the power supply. These simple checks help prevent electrical hazards and protect both the operator and the equipment.
How to Power On Your Coil Winding Machine:
Release the Emergency Stop (E-stop).
Flip the power switch on the base.
The controller will boot into Waiting state. The “Ready/Waiting” indicator lights up when it’s ready. If it’s off, the machine is in Setting state, meaning parameters can still be adjusted.
Front Panel Controls

Nine function keys on the tape machine handle power, start/stop, reset, manual jog, direction control, and auto/manual mode selection.
Two adjustment knobscontrol speed (winding/taping RPM) and pitch (spacing between turns or tape wraps).
The direction switch controls rotation direction, setting CW (clockwise) or CCW (counterclockwise).
The mode switch toggles between Manual mode (slow jog and setup adjustments) and Auto mode (continuous winding/taping).
Operation Flow of the Tape Winding Machine
Start/Stop key: arms the system and starts the cycle
Reset key: clears errors or gets ready for the next job
Manual mode: used for setup, coil positioning, or trial runs
Auto mode: enables repeatable, hands-free winding/taping with stored programs.
You can also run via foot pedal mode or switch to full Auto-start (machine ramps up and down automatically).
Rear Panel Switches

The base and rear control panels house all connections and deeper configuration settings:
Base sockets connect the controller, foot pedal, sensors, and—on taping machines—the auto-scissors, also including fuse access and main power input.
The mode selector switch lets you choose Pedal mode (pedal controls speed/stop) or Auto-start (automatic acceleration/deceleration by controller).
The grounding terminal must always be securely connected before operation.
On the controller rear panel, you’ll find several machine configuration switches:
Machine type switch: selects toroidal, belt/slider, gear head, or taping models.
Rotation switch: sets single or double-direction rotation when reversals are required.
Transducer switch: matches the correct sensor type(e.g., JG = 7PA, JGC = 7NA). an incorrect setting will prevent the counter from working.
Core start direction switch:sets the starting direction for fan-shaped windings in Auto mode.
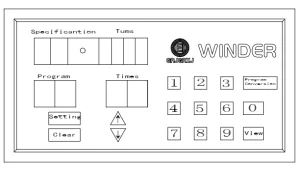
Controller Programming Overview

Ae t thheart of Guangri’s toroidal taping and winding machines is the controller panel, where operators set up and manage every job. The panel uses four key display windows:
Specification window – stores job numbers and allows quick saving or recalling of coil specifications.
Program window – sets the working sequence, such as Load → Wind, with support for additional tap steps.
Times window – defines how many times each step repeats, reducing the need for repeated programming.
Turns window – sets precise turns for loading, winding, slowdown, and reversal in fan-shaped windings.
The machine operates through three control states:
Setting state – where parameters are entered and adjusted.
Ready state – once settings are confirmed, the machine is ready to run.
Review state – meanwhile, stored parameters can be checked before pressing Start.
Auto & Pedal Control Modes
Additionally, the Guangri machine offers flexible control, allowing smooth switching between pedal operation and Auto-Start mode.
Pedal mode: The operator controls speed and start/stop using the foot pedal—ideal for setup and manual machine control.
Auto-Start mode:Set via the rear switch on the base, the machine automatically ramps up to preset speed and smoothly slows down at the end without pedal input.
Notably, the proportional linking between the main drive and rotation drive is a key feature of the Guangri machine. It keeps wire pitch accurate at any winding speed, ensuring consistent spacing and tighter control across different coils.
Different winding heads need slightly different handling; the Guangri machine supports multiple head designs:
Slider head – First load the core, then adjust the friction spring and pressure pad to set proper wire tension; ensure the slider moves smoothly without blocking the wire.
Belt head – Secure the wire end, then fine-tune grip using the belt tension screw. Keep the free wire end stable under the core before winding.
Gear head – Set the brake to the correct tension before loading. Align the magazine and slider properly, and make sure the wire passes through the guide groove without slipping.
Taping head – Route the tape through the pressure clip and electric scissors before feeding it into the magazine. Once running, the machine applies tape automatically and the scissors cut it at the end.