


Bobinas toroidales are widely used in applications such as transformers and inductors, where their design helps reduce interferencia electromagnética (EMI) and improve overall performance.

However, manually winding bobinas toroidales can be a complex and time-consuming process.
A DIY toroidal coil winding machine offers a practical alternative, helping achieve more consistent and accurate winding while reducing the need for manual work.
Componentes necesarios para la máquina bobinadora toroidal casera

Before starting the build, let’s review the essential components you’ll need for a DIY toroidal coil winding machine.
- Controlador Arduino
- Motores paso a paso
- Motores de corriente continua
- Codificador rotatorio y pantalla LCD
- Correas y poleas de distribución
- Anillo de carrete y soportes
- Miscellaneous Components
Guía paso a paso para el bobinado personalizado de bobinas
Paso 1: Diseñar el marco y el ensamblaje

Begin by designing the base frame, roller holders, and ring assembly using madera contrachapada y perfiles de aluminio.
Make sure the frame is sturdy and stable enough to support the movement of the motorized components.
The design should also allow for easy adjustments during the toroidal coil winding process while keeping the núcleo toroidal securely in place.
Paso 2: Configurar los motores paso a paso y los motores de CC

Securely mount the stepper motor and Motor de corriente continua to the frame.
The stepper motor controls the rotation of the núcleo toroidal, while the DC motor drives the spool.
For precise motion control, use NEMA 17 stepper motors. Connect both motors to the Arduino controller to coordinate their operation and adjust movement as needed.
Paso 3: Instalar correas de distribución y poleas

Connect the timing belts to the motors and spool ring, making sure the pulleys are properly aligned for smooth operation.
Adjust the belt tension to prevent slippage during operation.
Proper belt tension is essential for bobinado de alambre preciso. Make sure the belts are neither too tight nor too loose.
Paso 4: Implementar el controlador Arduino
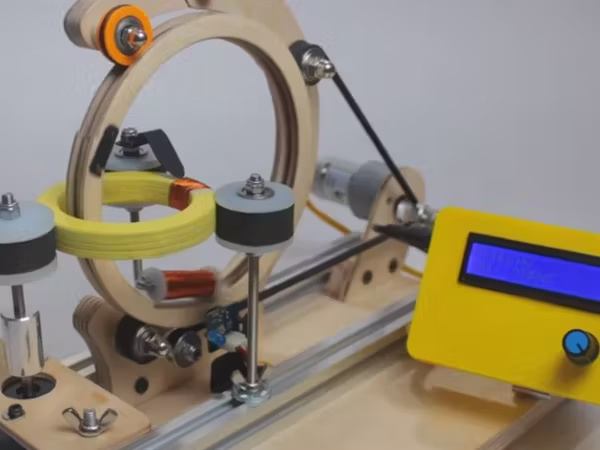
Connect the Arduino controller to both the stepper motor and DC motor. Program it to adjust the Número de vueltas, wire density, y rotation speed through the LCD display.
This setup allows you to adjust key winding parameters and customize the toroidal coil winding process to suit your needs.
Paso 5: Prueba y calibración
Run several wire winding cycles to test the machine’s operation.
Adjust the motor speeds and inspect the wire placement to ensure consistent winding.
If you notice issues such as belt slippage or misalignment, adjust the motor speeds, pulley alignment, and belt tension as needed to achieve smooth operation.
Paso 6: Toques finales y consideraciones de seguridad
Once the machine operates smoothly, install protective covers around moving parts and add rubber feet to keep the machine stable.
Make sure all components are securely fastened and double-check the wiring to help prevent accidents.
These final checks help ensure your DIY máquina bobinadora toroidal is safe, stable, and ready for use.
Errores comunes que se deben evitar

Even a well-built DIY toroidal winding machine may not perform as expected if certain details are overlooked. Keep these common pitfalls in mind:
Calibración de tensión del cable de salto can result in uneven winding and wire breakage.
Apretar demasiado los cinturones can place extra strain on the motor and shorten its service life.
Descuidar las características de seguridad ,such as proper insulation, protective covers, and emergency stops, can increase the risk of accidents.
Careful planning and thorough checks can help you build a safer machine and achieve smoother operation.
Preguntas frecuentes
1. ¿Para qué se utiliza una bobina toroidal?
A bobina toroidal is commonly used in transformers, inductors, and chokes. Its ring-shaped design helps reduce interferencia electromagnética (EMI) and improve energy efficiency.
2. ¿Cómo se enrolla una bobina toroidal?
To wind a bobina toroidal, pass the wire through the center of the core, wrap it around the outside, and pass it through the center again. Repeat this process until the required number of turns is reached.
3. ¿Cuál es la ventaja de una bobina toroidal sobre una bobina normal?
The symmetrical design of bobinas toroidales helps reduce magnetic flux leakage and electromagnetic interference. These characteristics make them suitable for use in sensitive electronic devices.
Conclusión

Building a DIY toroidal coil winding machine can simplify the winding process and help achieve more precise, consistent results.
Automation can make bobina toroidal production easier and more efficient, with output tailored to your specific needs.
Ready to get started? Follow this guide to build your own machine, or Contáctanos para más consejos o soluciones personalizadas!
 Spanish
 English
 Russian
 Italian
 German
 Chinese